

If your disk is full and you get a message “Disk is almost full while using your Mac” then surely the article is meant for you. If you are facing a storage issue then the time has come to clean your Mac device. Storage problems can also occur in Mac devices as there is no hard drive invented that offers unlimited storage space.
You can free up space on Mac by zipping files or storing them on iCloud, deleting unwanted files, locating junk files, removing unused apps, etc. Though cleaning the disk is a repetitive task, it is quite important to ensure the smooth and fast running of your system.
Cleaning the hard drive is a little time-consuming task and also requires computer skills. So, if you don’t have much time and appropriate skills then you can also use cleaning tools like Gemini 2 which is a duplicate file finder for mac and CleanMyMac which is mac cleaning tool or any other reliable software. These tools also offer a free version and clean your device efficiently. But make sure you have taken a backup of your system before using any of the cleaning tools.
Methods To Free Up Space On Mac
In this article, we will discuss the best ways to free up space on Mac.
Method 1: Uninstall the Unused Applications with their leftovers

Removing the unwanted applications that are consuming a lot of disk space is a must to free up a huge part of your hard disk. For this, you can follow several methods like dragging the application to the trash. Secondly, you can use Launchpad and the last method is using a third-party uninstaller tool. The last method will remove the application as well as its leftover items.
- Uninstall Applications using Launchpad – Firstly, open Launchpad then click and hold the unused app icon until it starts wiggling. Click on the x symbol at the left of the app icon to delete it.
- Use Third-Party Uninstaller – After you uninstall the applications still their leftovers remain in your device and fill its space. You need to remove these leftovers using the third-party tool. Here I am taking the example of CleanMyMac X whose detailed review you can read on BestMacAdvisor.
For this download the CleanMyMac X application and then click on the uninstaller tab from the left side of the window. Check the leftovers section. And click on those applications which you don’t want to keep in your system. Click on the uninstall icon to remove them completely.
Method 2: Removing Data from Trash Cans

It is important to remove the data from trash cans as when you delete anything on Mac it is stored in a trash can despite deleting permanently and still consumes a large part of disk space. There are several trash cans in your Mac so you need to empty all the trash cans to free up disk space.
To clean your user account’s main trash can you need to click right on the trash icon and then select the empty trash option.
Other trash cans are involved in iPhoto, mail and iMovie. When you delete media files using these applications then the deleted items get stored in their trash cans. To empty their trash cans, you just need to click right the trash icon in the particular application and click empty trash option.
How to empty trash automatically
When you delete anything, it goes directly to the trash cans so when your mood changes or you require the app you can restore it from there easily. But you can schedule deleting those trash files. It will permanently delete the files that are stored in trash after 30 days. It is an automatic process that requires simple steps to follow:
- Firstly, open the finder.
- After that click on preferences.
- Then choose advanced options from the top of the window.
- Tick marks the box stating to remove items from the trash after 30 days.
Method 3: Remove the Temporary Files
The temporary files stored in your Mac cause storage issues. It consumes a lot of disk space without any reason. If you clean these temporary files, you can recover a large amount of precious disk space. Follow the below steps to clean temporary files:
- Go to finder and then select the Go tab.
- Now, click on go to folder and type -/Library/Caches and then click on Go.
- A cache folder will open and then you can select all the files you want to delete. • Right Right-click the file you want to delete and click on move to trash option.
If you don’t want to perform the method manually then you can also use CleanMyMac to search and delete temp files automatically.
Method 4: Cleaning the Browser Cache

If you are using the internet heavily then you have a lot of browser cache stored in your Mac. Excess of the cache files makes your system slow and that is why you need to clean it. Removing the browser cache helps you free up a great amount of disk space.
- Clean Safari Cache – Open Safari browser and click on preferences. After that click on the advanced option. At the bottom of the page tick the box next to the Show Develop menu in the menu bar. Then click develop and at last click on empty caches.
- Clean Chrome Cache – Open Chrome Browser and click on the three-dotted icon at the top right of the window. Navigate to more tools and then click on clear browsing data. Now select the time range from the drop-down menu. Tick marks the boxes you want and then click on the clear data option.
- Clean Firefox Cache – Navigate to the menu and select preferences. Choose the privacy and security from the left window and the cookies and site data compartment click on the clear data option.
Method 5: Storing the files on iCloud
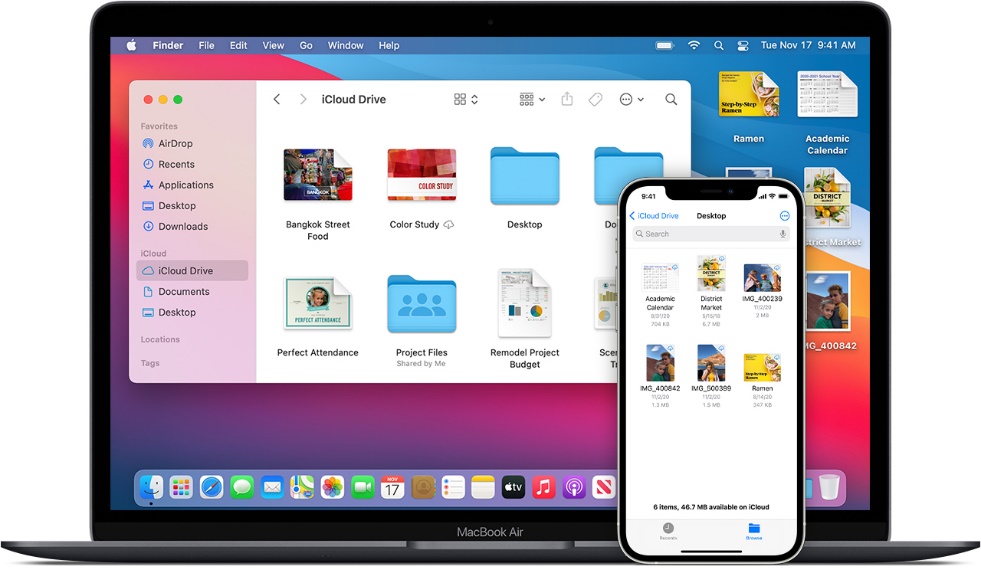
Apple offers iCloud service to store your data for easily accessing as well as freeing up a large amount of disk space. You have three options to choose from when storing files.
- Messages – Here you can store all your messages and attachments.
- Desktop and Attachments – iCloud stores all the files that are located in these folders. If you want to access the files on iCloud you need to download them first.
- Photos – iCloud stores all your photos and videos in their original resolution and quality. When the Storage space of Mac runs out the Space-saving versions are there in your Mac.
You get 5GB of free storage space in iCloud but in case you require more space it also offers you to purchase it. It costs you $0.99per month for 50 GB.
Follow the given steps to store your data into iCloud:
- Go to the top left of your window and click on the apple icon.
- Then click on about this mac.
- After that navigate to the Storage tab and choose the manage option.
- Next, click on the store in iCloud option on the right side.
- In the pop-up box, tick all the types of files you want to store in iCloud and then click the Store in iCloud option.
Conclusion
In this article, we have listed the top methods that help you free up space on Mac. Apart from them, there are many more methods you can use to clean your Mac and restore the lost disk space. Like you can clean unused languages files, delete mail attachments and junk mail, remove old iOS backups, etc. You can also use third-party tools to clean your Mac.
Although the above methods work for you and help you recover the space. I hope the article would be useful for you and you enjoy the great speed and smoothing performance of your Mac with its huge storage space.


