

If you’re looking for .Net Web Development in 2021, you have to use ASP.NET Core which is an open-source framework developed by Microsoft. ASP.NET Core helps in building modern, internet-connected, and cloud-based web applications and websites. It’s designed to enable runtime components, compilers, APIs, and languages to evolve quickly.
In this article, we will provide you with .NET Web Development Checklist for 2021 that will help when you hire dedicated .net developers for your project. We’ll simply provide you with a guide to creating a basic asp.net core website that shows the welcome message.
A Complete Checklist to Create a Website on .NET Core
Prerequisites
Install Visual Studio
To begin with .NET Web Development, first, you need Visual Studio. If you don’t have it already installed, you go to Visual Studio Downloads to install it for free.
Select Your Theme
This checklist consists of screenshots with a dark theme. If you don’t have a dark theme at the moment, but would like to see it, then you can learn it from the Personalize the Visual Studio IDE and Editor.
Now that you’ve looked at the prerequisites let’s start with our checklist.
Create a project
You’ll begin with creating an ASP.NET Core web application project. This project type consists of all types of project files that help in creating a web app. To create a project, you have to follow the below steps:
Step 1
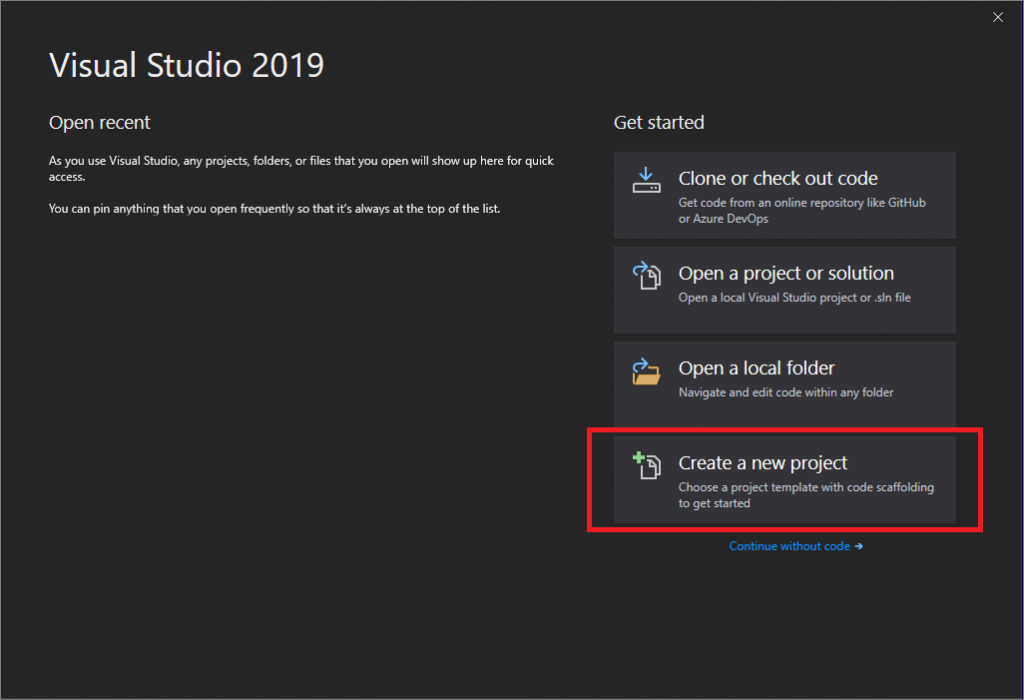
In the first step, you have to select Create a new project in the start window.
Step 2
Go to the language list in the Create a new project window and select C#. Similarly, choose Windows in the platform list and Web in the project types list.
Once you’re done with selecting language, platform, and project type filters, select ASP.NET Core Web App template, and then click on Next.
In case you don’t see the option of ASP.NET Core Web App template, then don’t worry. You can go to Create a new project window and install it from there. Here, you’ll find Not finding what you’re looking for? message. Just below that, there will be a link Install more tools and features.

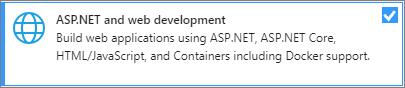
Once you click on the link, you have to choose ASP.NET and web development workload in the Visual Studio Installer.
After that, you have to choose the Modify button in the Visual Studio Installer. If you’re asked to save your work, then please do it. Once saved, select Continue to install the workload. Once the installation finishes, you can move to step 2.
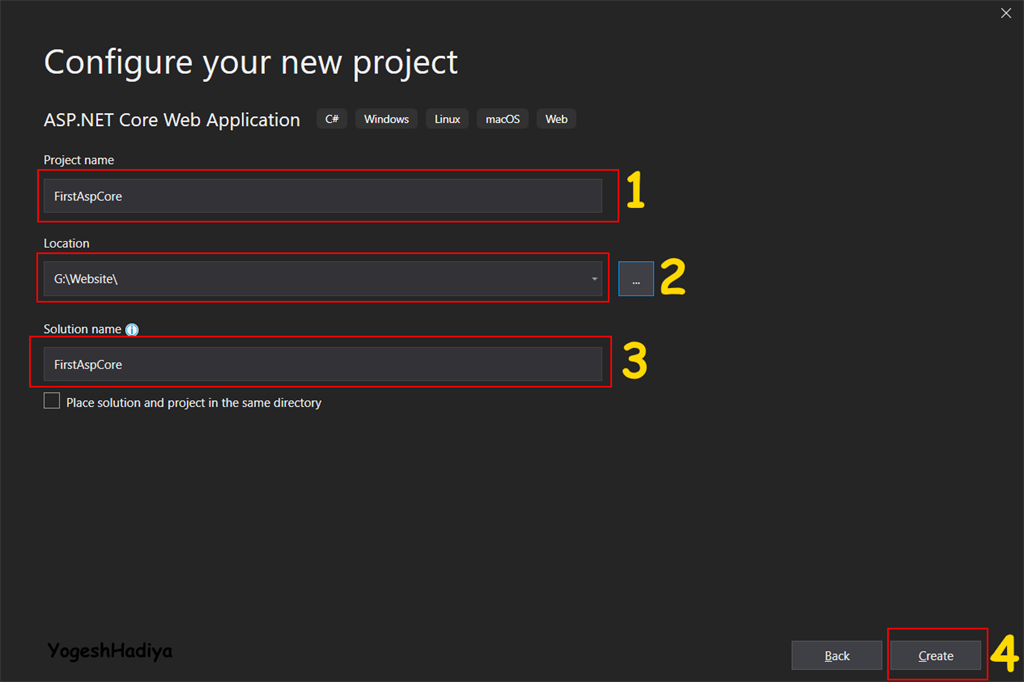
Step 3
In the next screens, you have to fill in the below details:
Project Name: – In this, you have to fill in the name of the project.
Location: – Here, you have to add the location where you wish to store the project. You can click on the button beside the location field and select your target location folder.
Solution Name: – Here, you have to enter the solution name. The solution name is shown in the solution explorer.
Step 4
You have to verify if .NET Core 3.1 is present in the drop-down menu in the Additional information window. Here, it’s worthy to note that you can decide to enable Docker support. For this, you just have to check the box. In addition, you can also add authentication support by clicking on the Authentication Type button. Here you’ll choose from:
None: – It means no authentication selected.
Individual accounts: – This option stores it in Azure-based or local databases.
Microsoft identity platform: – It uses Azure AD, Active Directory, and Microsoft 365 for authentication.
Windows: –
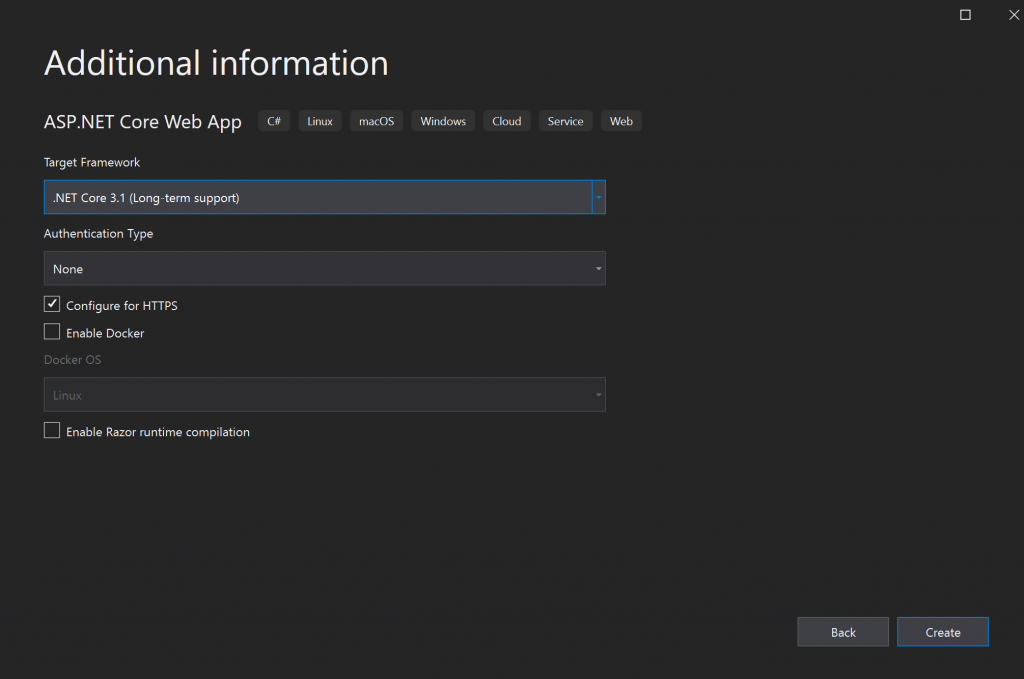
Here, you have to select the None among the four options and leave the Enable Docker box unchecked. Once done, you have to select Create. Visual Studio will start a new project.
Create and Run the App
Step 1
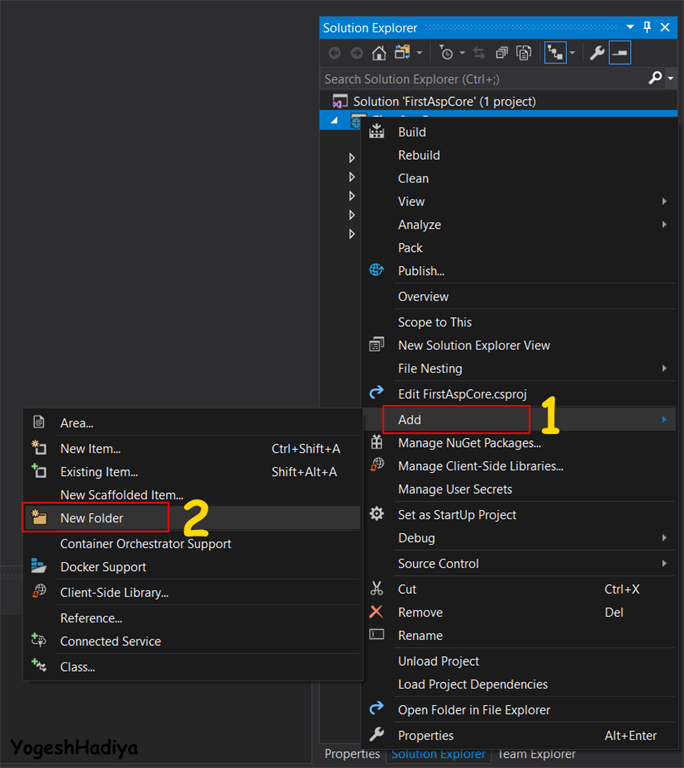
Now, your project is open in Visual Studio. Here, open solution explorer, then right-clicks on your project name, click on Add option, and select New Folder. Navigate to Project Name ➤ Add ➤ New Folder. Name this folder as Controllers.
Step 2
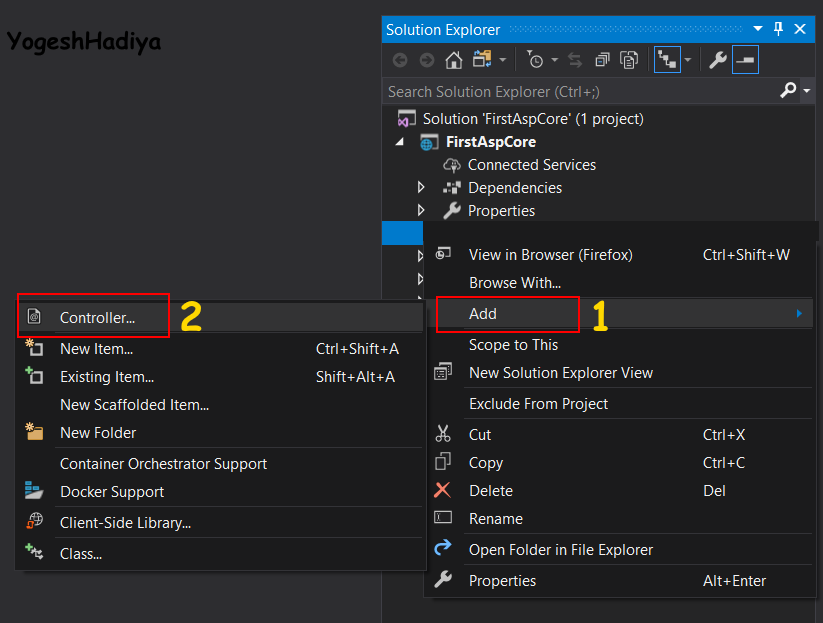
Now, right-click on the Controllers folder ➤ Add ➤ Controller.
Step 3
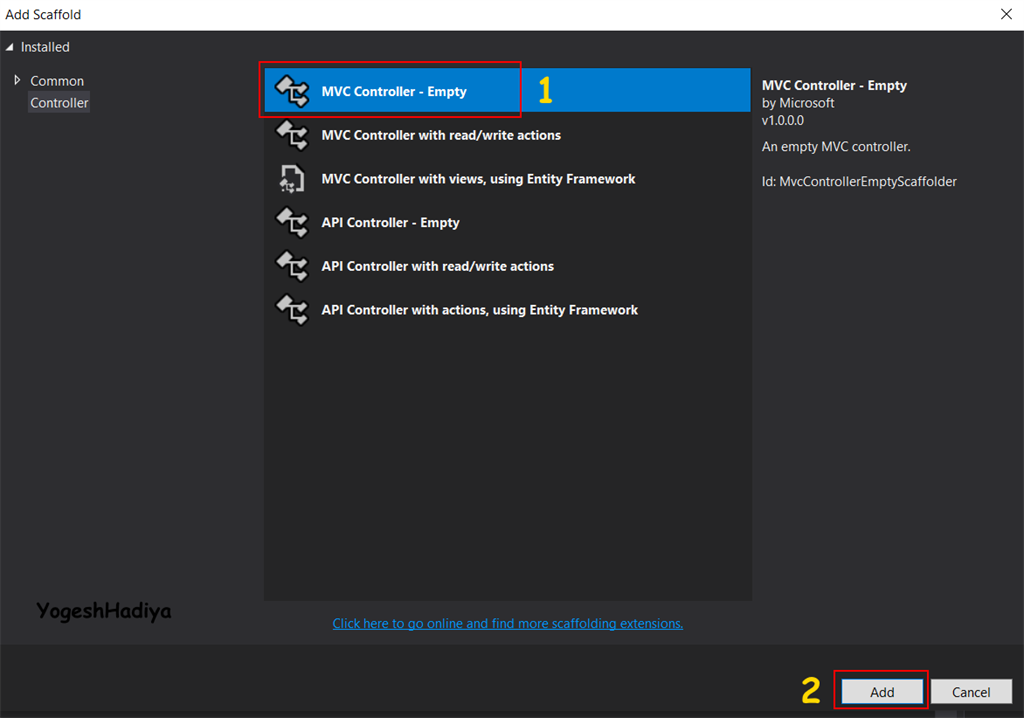
Once you click on the controller option, you will see a new window. This window will have multiple options, out of which you have to select MVC Controller – Empty and then have to click Add.
Step 4
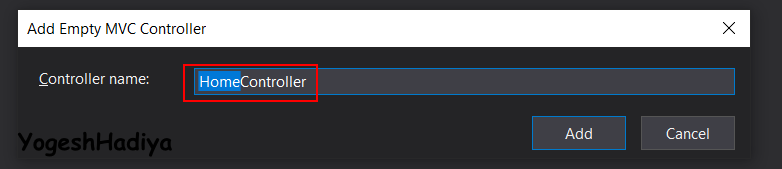
Name your controller, ensuring that you do not remove the word Controller from it. For simplicity, we’ll name it as HomeController and then click Add button to create it.
Step 5
Once your controller is created, you’ll see an action method named Index. Visual Studio creates an index by default. You can create other methods too if you want to. Here, you have to right-click on the action method. Then, you have to click on Add View to add an Html file.
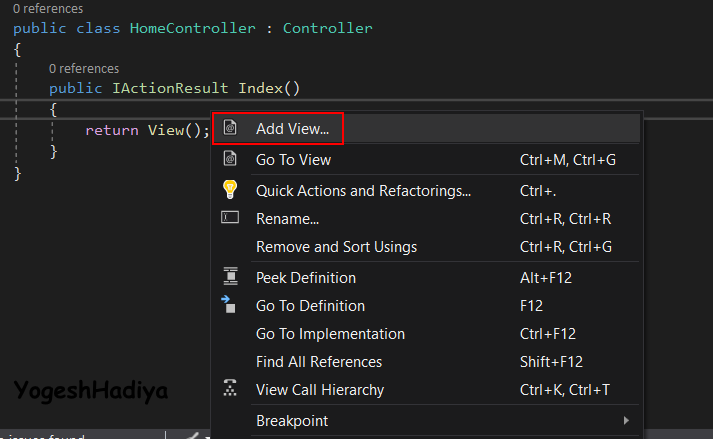
Step 6
Here, you’ll see a window with the below options:
View names: – Name of your Html file.
Template: – There are several templates. Here, empty templates only offer Html files with h1 tag and title.
Model class: – In case you select any other template apart from the empty, then you have to select the entity model.
Create as a partial view: – You have to call this file in another Html file. You can also call it in a modal popup.
Reference script libraries: – This option is checked by default.
Use a layout file: – You need to select the layout file if you haven’t created the view as a partial view.
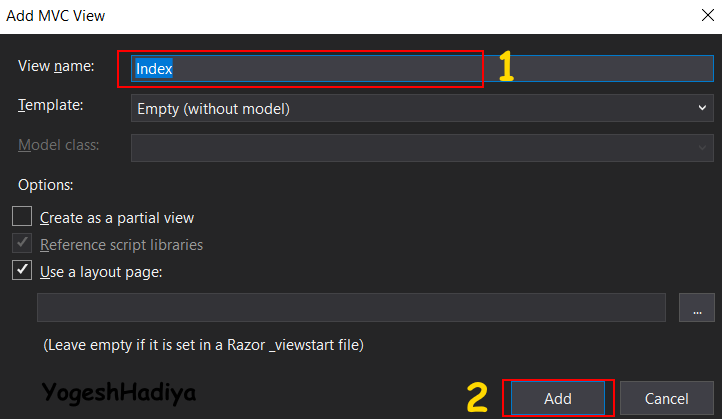
Name your file, choose an empty template, and check on the Use layout page. Now click on the Add button to proceed further.
Step 7
Open the Html file in the views folder and make changes as per your wish.
Step 8
Open the Setup.cs file and make changes as shown below.
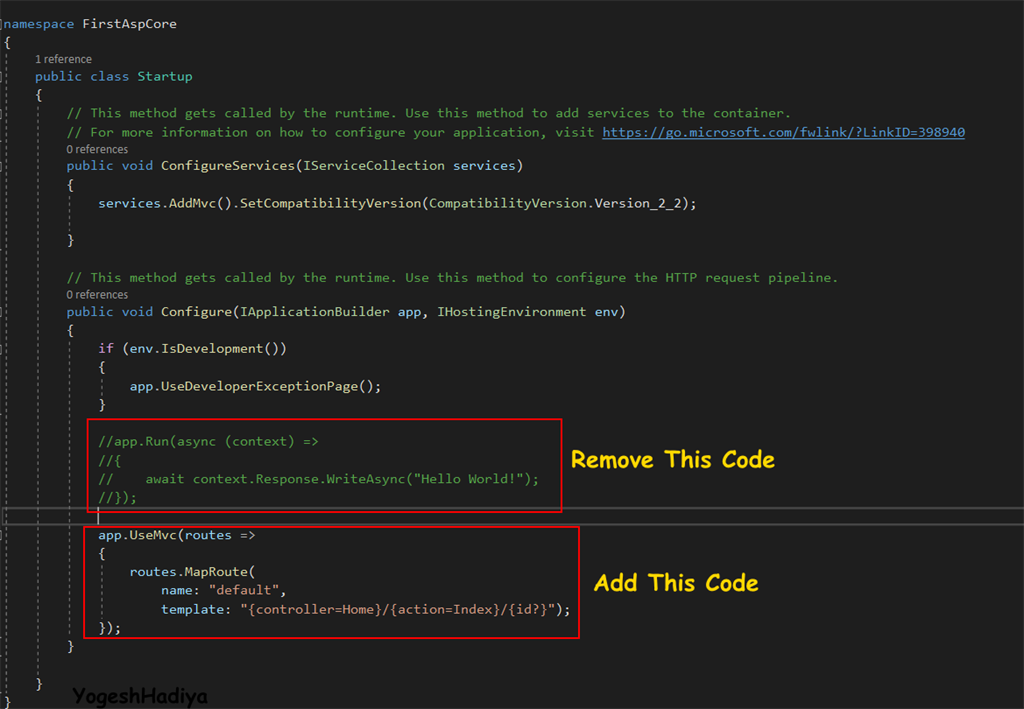
- UseMvc(routes =>
- {
- MapRoute(
- name: “default”,
- template: “{controller=Home}/{action=Index}/{id?}”);
- });
Code Explainer
The above image shows that the compiler has already created some code in startup.cs file. The code in the image returns the hello world string to the webpage. But we have to change this code since we want to call our Html view.
app.UseMvc: – This indicates that the website/application uses MVC.
Route.MapRoute: – It calls controller or file from website
name: – It’s an optional name to identify if you have more routes
Template: – You have to pass the pattern of the application. You can pass Id which is an optional parameter. The question mark that follows id signifies that it may or may not have value. It means that it could be a nullable object.
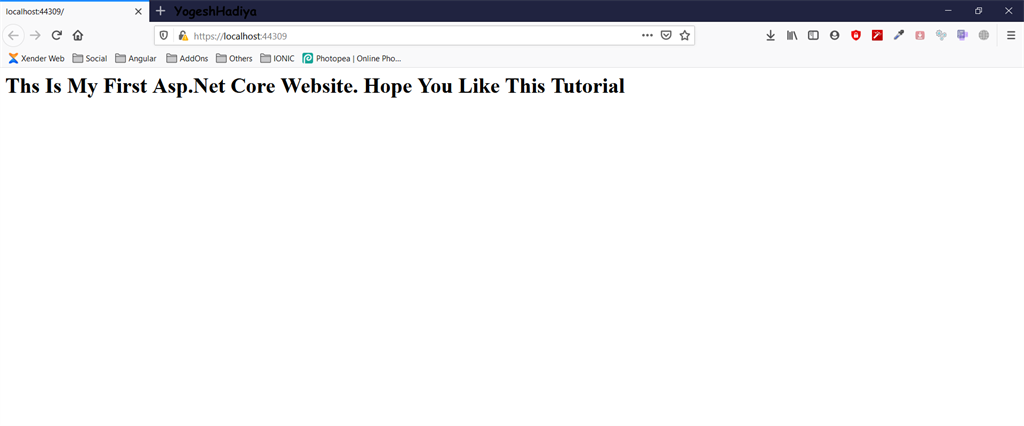
Step 13
At last, you just have to run your application, and your ASP.NET Core Website is created.
Conclusion
Creating websites using ASP.NET Core can be complicated. But with our checklist, you can develop your websites and web apps with speed and ease. Now, all you need to do is hire dot net developers and instruct them to use the above checklist to develop your websites and web applications.


