
The use of FlatList component is useful to arrange data in a structured format. You can either arrange it horizontally or vertically. It is one of the useful components in React Native. If you want to learn how to embed the component in a React Native app, follow this tutorial blog brought to you by developers of react native development company.
What is the usage of FlatList?
You can consider the FlatList component as the performant interface. In simpler terms, using this component, you can create a list of items allowing users to scroll and get the elements. Unstructured data cannot be added in the Flat list view. You have to ensure that the data type is structured. The items to be placed in a list can be videos, images, and texts.
To use this component in your codebase, you have to import the component (FlatList) from react-native.
The two main props used with this component are
- Data- Data is presented as an array. You have to add all the elements you want to show on the view in data.
- RenderItem- in the codebase, renderItems is considered a function. It takes items from the data source and presents them on the screen. The variables used with renderItem are usually item and index. Items hold an accessible value whereas the index indicates a number that specifies the item’s position in an array.
Prior-learning to be acquired
As we want to build a React Native project with a flat list view, we need the environment for the framework. So, you have to install software and dependencies. Also, note that you have to consider the React Native CLI and not the Expo CLI for the current project. So while setting up the environment, you have to get the software specific to the React Native CLI.
Also, you have to create a template for this project. Also for this, we have to use the React native framework. To build the template you have to run npx react-native init FlatList_view –version 0.68.1 on the command prompt. Before executing this command, you have to build a new folder and open the cmd from that folder.
As your template is created, you can move forward with the codebase.
Code Snippets for the FlatList view
![]()
Image 1
The code syntax in image 1 is a JS import statement. It imports components such as FlatList, TouchableOpacity, Image, Text, View, and StyleSheet. Also, you have to import the entire React from the react library.
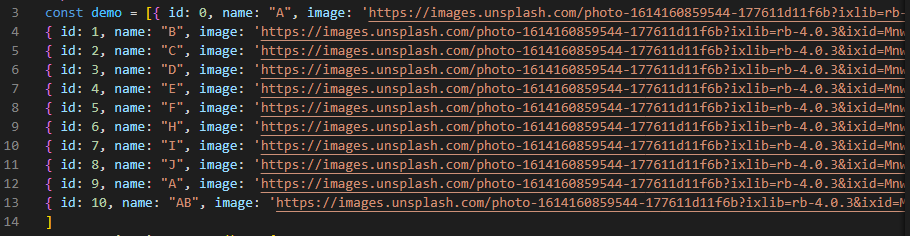
Image 2
Now, you have to introduce the data source. Here, I have named the variable as demo. It is an array. I have inserted 11 images that I want to render as a list form on the app screen. You can add more than 11 images. Also, if you want, you can add a list of texts or videos, or graphics. While adding the image, you have to provide a unique id and name to each of the image URLs. here, each element of the array is an individual object.

Image 3
It is a function that is called when the user scrolls to the bottom of the FlatList view. It displays an alert text with “Reload Data”.Here, you can add an API key to render a huge volume of data on the screen of the app. It is presented in the list form. In that case, you don’t need to create this alert box. Just create a reload box to call more data from the embedded API key.

Image 4
Specify a function App. This is an integral part of our project. You need to return the View and Text components with styling elements. The View style is for the entire Container and the Text style is for the Header text. The Header text shows “FlatList Implementation”.
The content added inside the Container is arranged in the column format. It is shown in two columns. With the function keyExtractor, the code allocates a key to a single item added in the list view.
Here, the demo variable is embedded in the data.
However, if you want the list in the horizontal format, you only have to delete the two lines mentioned below.
contentContainerStyle={{ flexDirection: ‘column’ }}
numColumns={2}
And instead, you have to enable horizontal. This renders items next to each other horizontally instead of stacked vertically.
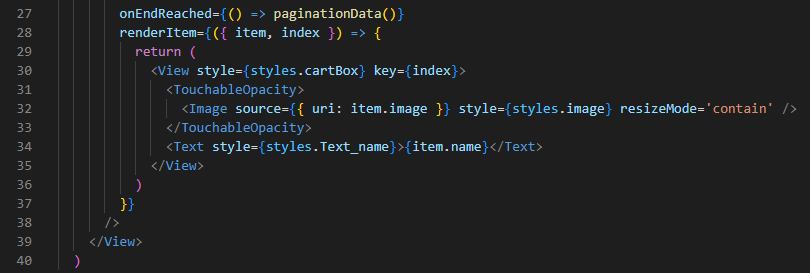
Image 5
It has an onEndReached prop. It calls the paginationData function when the user reaches the list end. Further, the renderItem prop takes in an item and index as parameters and returns a View component with an Image and Text component inside it.
If you want to understand the difference between renderItem and OnEndReached? Here it is.
onEndReached is a prop that considers a function as its value. It is called when the user reaches the end of the list. renderItem is another prop. However, it holds an object with two properties: item and index. The item property contains one element from the data array, while index contains its position within that array.
![]()
Image 6
Lastly, we have to consider the line export default App.
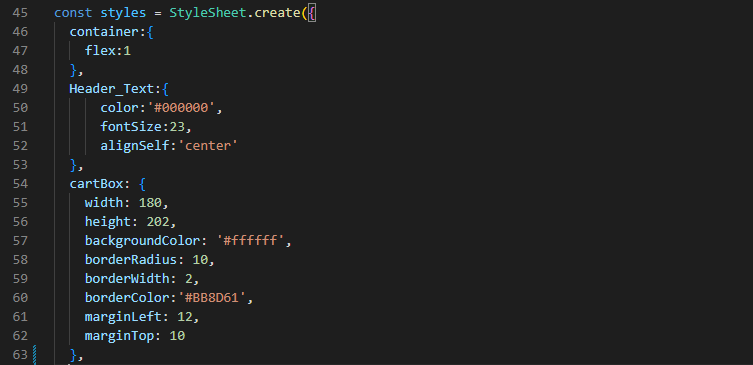
Image 7
The syntax shown in image 7 is about using the StyleSheet and designing the styling objects. The styling in Javascript is the same as that of the CSS styling method.
You have to consider the objects like container, cartBox, and Header_Text. There are different parameters used for these objects. It includes flex, color, fontSize, alignSelf, height, width, marginLeft, marginTop, and others.
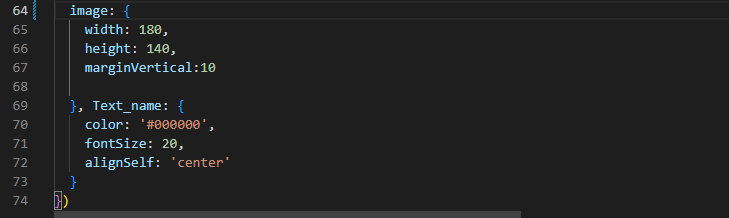
Image 8
There are two other styling objects that I have added to my project. These are images and Text_name.
How to test the scrollableView interface?
After building the project, you have to test the project. You can either do it on the emulator or on a real device. However, in this case, I will explain to you the steps of testing the project on a virtual device or on an emulator.
Create a terminal from your project folder and then you have to run two commands. The first one is npm install and the second one is npx reat-native run-android. It will start your emulator on your dev screen. For the output, refer to images 9 and 10.
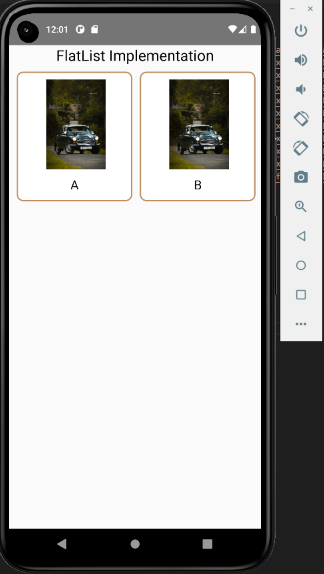
Image 9: Vertical scrollView
Image 10: Horizontal ScrollView
This is how it will show if you design the list view vertically (image 9) and if you design it in horizontal format (image 10).
Build a template and practice it now to learn what additional elements you can add to the project.
react native app development company


