Most of us use an external drive as an backup option or backup drive so that we can store our images, video, documents and many other files on it. And not only for backup its portability and the storage capacity makes it a perfect choice for most of the users to store their precious images or videos or even the most important document files.
But no matter how carefully you use the external storage drive, there may be an instance when you can accidentally delete a file from it or lose them to an interruption in transferring the data. Whatever be the reason, it will surely leave you in a painstaking situation.
So if you have found yourself in a similar situation and wish to restore the deleted files then our article will surely help you. In this article we will discuss thoroughly tested methods to restore deleted files.
Recover Deleted Photos from Recycle Bin
If you have accidentally deleted any file from the internal hard drive of your computer then you can easily get them back from the Recycle Bin of Windows. So can you get the files deleted from your external hard drive in the Windows Recycle Bin folder? The answer for this is unfortunately, no.
The files deleted from the external hard disk do not go to the Windows Recycle Bin. But the best thing is that each hard drive has its own Recycle Bin folder. And there is a Recycle Bin folder for your external hard drive as well.
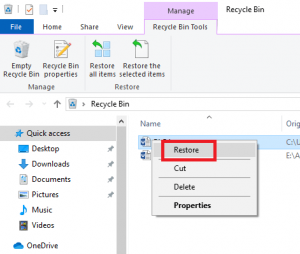
So to access this Recycle Bin, first connect your external drive to your computer and click on the Recycle Bin icon located on the desktop of your computer.
Note: Windows shows a combined view of all the Recycle Bin folders that exist on your computer. This too includes the Recycle Bin folder for your external hard drives. You can further check the respective Recycle Bin folders for each drive, their location, and their size by right-clicking on the Recycle Bin icon on your Desktop and selecting the Properties option.
Now to restore deleted files from Recycle Bin is extremely simple. Just open the Recycle Bin folder > Select the files > Click on Restore button.

This will put all the deleted files back to their original location.
However, the problem is that by the time you realize that you lost the data and need to recover it from the external hard drive, the files are no longer available in the Recycle Bin.
Also, instead of deleting the file with the Delete button, users generally use the Shift + Delete key combination for deleting files. And this deletes the files permanently from the system without even moving them to the Recycle Bin.
In all such cases, you need to take the help of a data recovery tool that can even recover the permanently deleted files from your hard drive.
Let’s check that out in the next section.
Recover Deleted files from Laptop Using a Recovery Software
So, you checked the Recycle Bin folder of your external drive but didn’t find any of your deleted files there. Then it means that the files are deleted permanently from the external storage device. But permanently deleted files can’t be recovered back is an old story as the technology has changed in the recent years. We now have some amazing data recovery software that recovers deleted files quite easily and effectively.
Now if you look on the Internet for a file recovery software then you will find a lot of options, and obviously this can confuse you on which to choose. However, we have tested some of these data recovery software in our labs under various testing conditions and parameters and found that Advanced Disk Recovery by Systweak is one of the best data recovery software to restore deleted files in Windows 10 machine as well as the external drive attached to it.
This tool did an amazing task and within a short span of time it retrieved all the lost files from our external hard drive.
Excited on how to use this tool, and then check out the steps listed below:
- To get started using the Advanced Disk Recovery program, first of all you have to download it on your laptop or desktop.
- It will take less than a minute for the product to download on your machine. Once the program is downloaded, follow the onscreen instructions to install it… The installation is easy and similar to any other windows program. After the successful installation of the product, you can find its icon on the desktop of your screen.
- Double click on that icon to launch the application.
- If you haven’t already yet attached your external drive, then please attach it first to your computer.
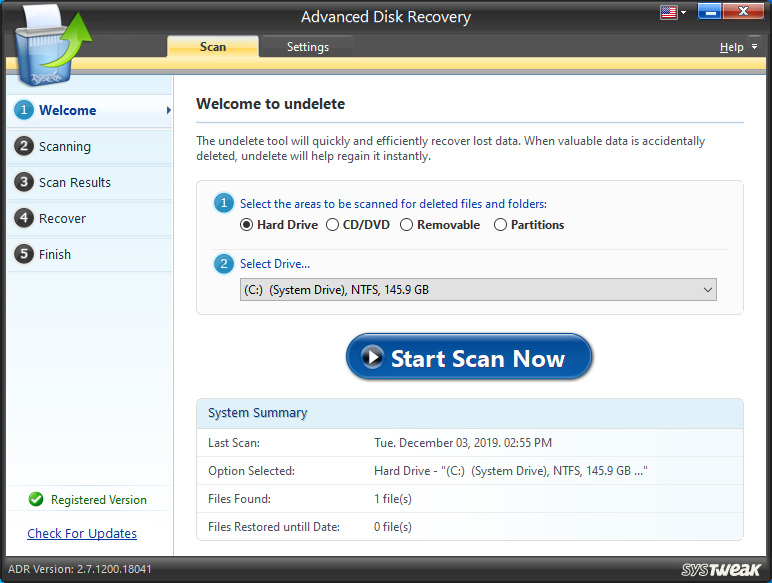
- Now once you have attached your external hard drive, select the Removable option from the program. This will provide you an option to add removable drives like external drives or USB flash storage.

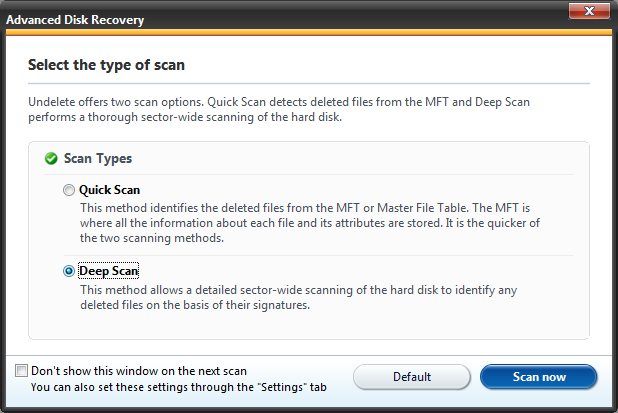
- Once you have added your external drive through the Removable option, now it’s time to scan it. Click on the Start Scan Now button, and on the next screen select the Scan Type, either Quick Scan or Deep Scan.
- Now once you have selected the Scan Type, click on the Scan now button to start scanning.
Note: For better results we recommend you to go with the Deep Scan mode as it will look at every sector of your drive to recover deleted files.

- Now, sit back comfortably and let the product scan your external drive for the deleted files.
- The time for the scan to complete will depend entirely on your disk size. But as compared to other recovery software the scanning of Advanced Disk Recovery is quite fast. Thanks to its advanced scan engine.
And once the scan completes, Advanced Disk Recovery will list all the deleted files that it has found from your external drive. - Next step is to go across the complete list of files that the product has found and select the ones that you want to recover. If you wish to retrieve all then you can select all. Now, once you have selected the files click on the Recover button followed by the location where you want to recover these files. All your recovered files will be put in that location.
Note: Always choose a different location i.e. never choose the external drive itself to recover the files. You can choose your internal hard drive as a location to save the files.
We believe that once you open that location you will get a big smile on your face since the product has recovered all your deleted files.
Recover Deleted Files from External Hard Drive using File History
To restore deleted files in Windows 10 we have another special feature known as File History. Confused? Let us explain to you in detail.
File History is a backup feature of Windows operating system that allows you to go back to the earlier time so that you can recover the previous versions of deleted data, and that too for free.
Also, using this feature is also quite easy. So here are the steps on how to to restore deleted files using Windows file history:
- Navigate to the folder from which your files were lost. Now in your case it is an external drive from where you wish to recover deleted files, so go to your external drive.
- Now, right-click and select Properties.
- Next click on the Previous Versions tab to select the previous version where all your lost files are present.
- Click on the Restore button to recover your files.
Note: Although this is a quite simple process, there is a catch in it. You need to have first activated the external hard disk on Windows File History, and in case you haven’t then unfortunately you cannot recover your deleted files using this method.
However, the tool, Advanced Disk Recovery that we have just discussed above will work flawlessly in all such scenarios and help you to recover your deleted files.
Conclusion
So folks this is all from our side. We hope that the article has helped you to recover your deleted files. But before we say goodbye to you here are some tips that you can follow to avoid data loss from happening on an external hard drive.
- Never connect your external hard drive to a virus-infected device.
- Make it a habit to take a regular backup of all your important data.
- Avoid chances of any interruptions while transferring files from an external hard drive.


