
A modal view can level up the game of your app’s UI. It also increases the UX of your app. With a service taken from a reliable react native app development company, the task gets much easier. React Native framework is useful for cross-platform app development. There are several components that you can use in your app-building process. One of them includes the Modal, which we will be incorporating in this project to make the modal view.
Let’s learn more about the Modal components.
What is the need to use the Modal component in the codebase?
The Modal component in React Native allows you to embed a view on top of the main content. You can render your app content on top of an enclosing display; thereby making the app more engaging. Both iOS and Android OS support React Native and hence, this modal view.
You can use the component properly only if you learn about its props. So, let’s learn about its pops or child components.
Here, we will discuss some of its props. They are as follows.
- statusBarTranslucent- This prop can only be used in Android OS. it is of the boolean category. With this prop, you can determine if the modal needs to be placed below the statusbar system. If you do not set any value to statusbarTranslucent, it will get the default value as false.
- Transparent- As the term ‘Transparent’ predicts, it will place the modal view on top of a transparent background, if the Transparent value is true. It is of a boolean category. Its default value is false.
- hardwareAccelerated- It is another prop of the boolean category. It determines whether the hardware acceleration needs to be embedded in the underlying window.
- onShow- This prop is a function that is called after the modal view is shown.
- animationType- this prop is used in place of animated. When you use this prop in your codebase, you can set the animation pattern of the modal view. There are three choices that you can make. These are fade, none, and slide. The standard or default is none.
- Visible- This prop is of the boolean category. If set to true, the modal view is visible.
Setting up the environment for the project
In this Modal view building process, we have used React Native CLI tool. So, if you are new to working with this framework, you have to set up the environment. For this, you have to download software and execute the configuration process. Note that the installation process is different for different OS (Windows, macOS, and Linux).
For Windows, you have to get an android studio, VS Code editor, and the most recent Node.js version. You also require JDK (Java SE Development Kit).
Note that while you are installing Android Studio, you have to get the below-mentioned components.
- Performance (Intel ® HAXM)
- Android SDK Platform
- Android SDK
- Android Virtual Device
You can find the detailed process in YouTube videos.
Now you have to make a template.
Building a React Native template for the project
This is required to embed the codebase. It involves some simple steps to follow.
- Go to your home screen on the system.
- Create a folder with a specific name you like.
- Open this folder from your local drive.
- Open the command prompt from this folder.
- Run npx react-native init ModalView –version 0.68.1 in it.
- This will build the required template under the main folder that you created first. It will be named ModalView.
As you create the template, design the codebase for the view.
Designing the codebase in the code editor
![]()
Image 1
Consider the import statement for importing native components from React Native. Here, we won’t be using any third-party plugins.
The components required for this project are View, Modal, Image, TouchableOpacity, Dimensions, StyleSheet, and Text. Aso, you have to import React from the react library. Lastly, you have to get the useState hook from the react library.
![]()
Image 2
Now, move forward with the prime function of the project, i.e., the App. All the operations, methods, and functions are embedded in this App.
Use useState hook to set the initial state of modalVisible. In the beginning, it will be false, which means that the modal will not be visible to users. Also, setModalVisible will be called when the user conducts an action on the app; hence, the modalVisible will be updated.

Image 3
return() function is used to create the main container, a text ‘create Modal’, and an Image. Note that the Image and Text components are wrapped with the View component. You can modify the text element and the Image by changing the text and the image source.
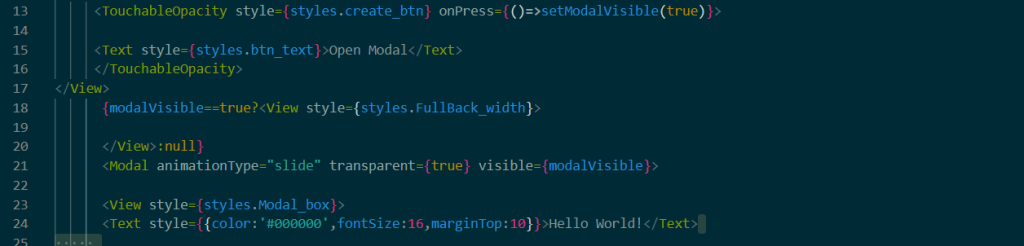
Image 4
The code syntax shown in image 4 creates a button for the modal view. It is a popup that appears on top of the screen.
TouchableOpacity creates the button and makes the modal appear when users click it.
onPress={() => setModalVisible(true)} lets the modal be visible on the screen. onPress is the event handler. It activates when users click on the button.
{modalVisible == true ? ( <View style={styles.FullBack_width}></View>) : null} is a conditional statement. It checks if the modal is visible. If it is, it shows the background view.
Lastly, with animationType=”slide” the code allows the modal slide and appear.
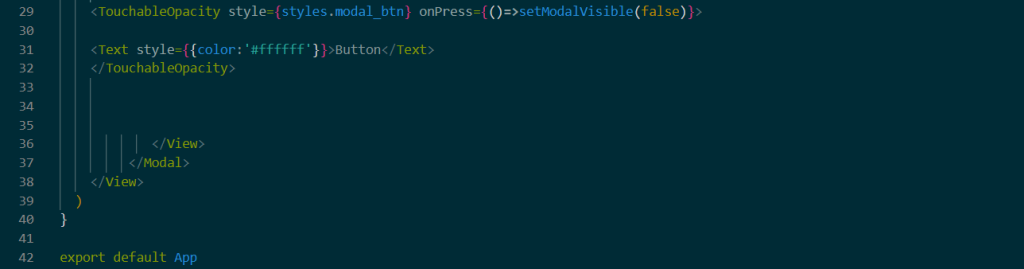
Image 5
Another button is created with TouchableOpacity. It has a styling object styles.modal_btn. This button activates the setModalVisible to false and hides the modal view.
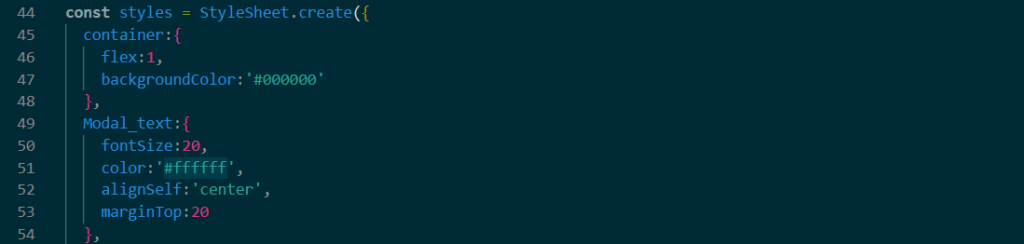
Image 6
This is the last part of the program. Here, you have to use the StyleSheet component and consider all the styling objects. This won’t need any explanation as you have to set the value of the styling objects.
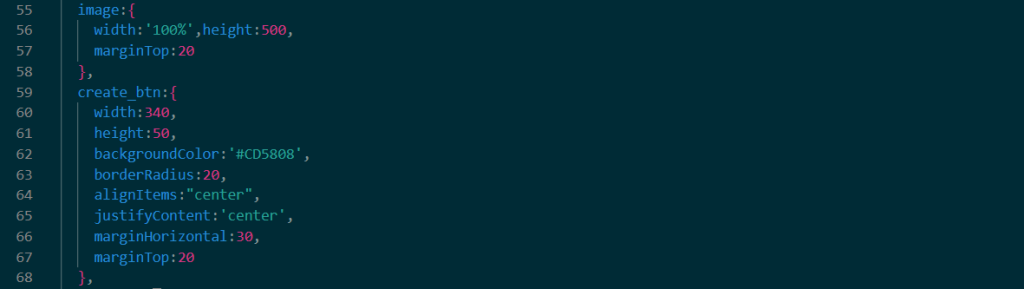
Image 7
Here, I have considered the percentage method for the width of the image. This will make your app responsive. This implies that the display of the image will be consistent throughout all devices and orientations.
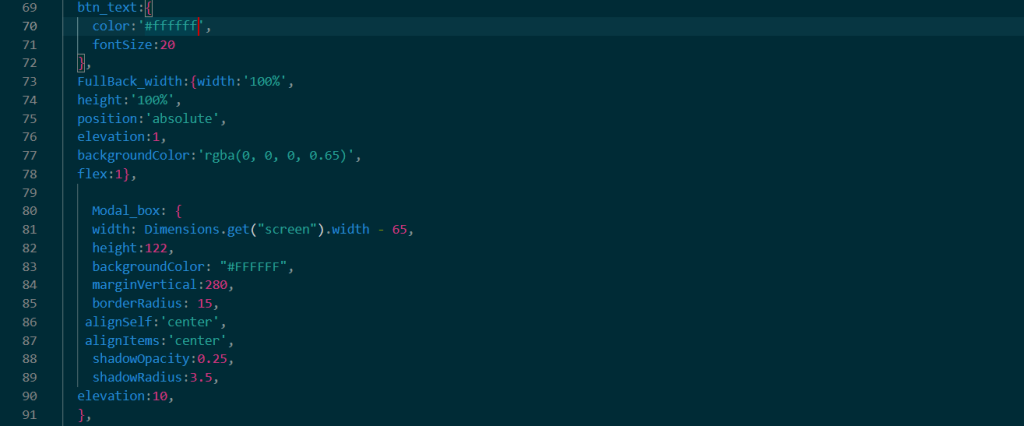
Image 8
As you can notice, I have considered the styling objects btn_text, Modal_box and FullBack_width.
For the Modal-box, you can use Dimensions. This is another method to achieve app responsiveness.

Image 9
Finally, you have to style the modal_btn with height, justifyContent, alignItems, backgroundColor, borderRadius, marginTop and marginHorizontal.
Executing the codebase on a virtual device
We will run the codebase on the emulator or a virtual device. Go to the command prompt and pass cd ModalView. This will allow you to execute the other two commands from the ModalView template.
Then run npm install and then npx react-native run-android. As your emulator starts, you will get the output as demonstrated in image 10.
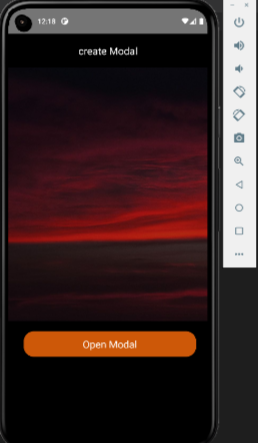
Image 10
Click on the button ‘Open Modal’ and get the Modal screen (refer to image 11).
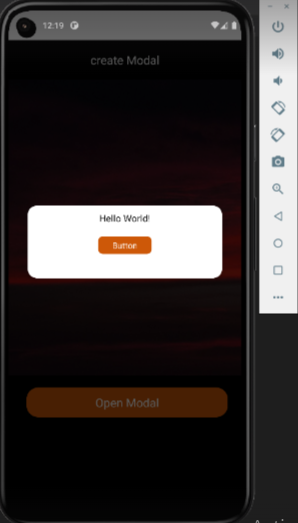
Image 11
And you have completed the project and executed the same on your virtual device.
Play with the React Native framework to get engaging UIs and interactive app screens.
react native app development company


