

If you are looking for a method to import OST to Office 365, you landed on the correct page. In this article, you will find different approaches to migrate your data simply and effectively. You can adopt any method as per your preference.
OST files also termed as Offline Storage Table is an Outlook data file. It stores an offline copy of the mailbox data. Whenever you modify the Outlook application, it will automatically get updated in the OST file. Therefore, these files contain your valuable data.
Office 365 is the most widely used technology for various office applications. You can easily access Word, Excel, PowerPoint, Outlook, etc., through Office 365. You may feel the need to upload your OST files to the MS Office 365 account. It is a smart move to protect your data.
There are also some other reasons for importing the files. Let us learn about them.
Advantages of Migrating OST files to Office 365
Migrating the files to an online server is beneficial in various ways. You can upload the file, but first, you must know the reasons for migration. Following are the most obvious advantages to import OST to Office 365.
- The first advantage of uploading the Outlook data file is that you can use it as a backup. So, you can restore the complete mailbox data in case of unintentional data loss or file corruption. So, you should import OST file to Office 365 to protect your data.
- Another benefit is that you can integrate the OST file with other Office 365 applications. It will help you in many ways. Also, you can share the files over the internet.
Now, you know the benefits, it is time to learn the methods to import OST into Office 365.
How to Import OST to Office 365?
The standard procedure to import OST file to Office 365 is slightly complicated and time-consuming. You need to perform various steps for the migration. The manual approach is efficient and free of cost. There are two steps in the standard method to migrate the data.
- Convert OST to PST file format
- Import PST to Office 365
Step 1: Convert OST to PST file format
It is not possible to upload OST to Office 365 directly. Therefore, you have to convert the OST file to a PST file first. After that, you can export the data. To convert OST into PST, follow the steps below.
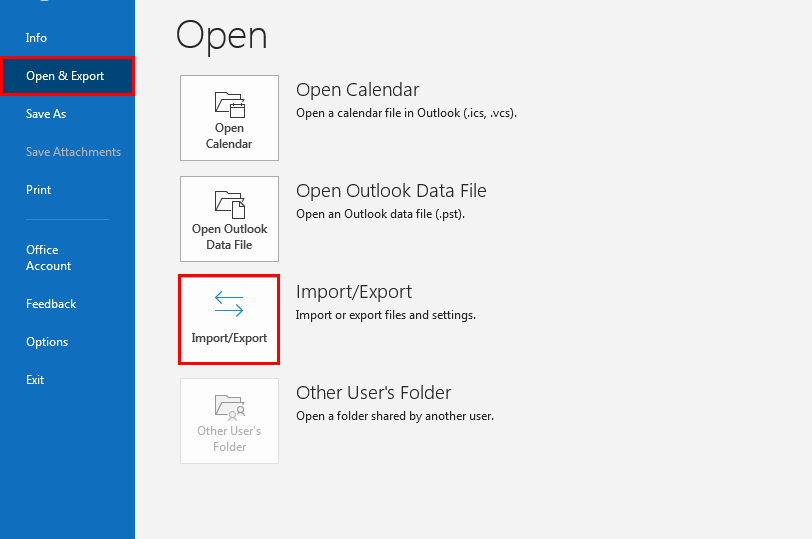
- Open Microsoft Outlook and click on the File
- Now, choose the Open & Export tab and then click on the Import/Export
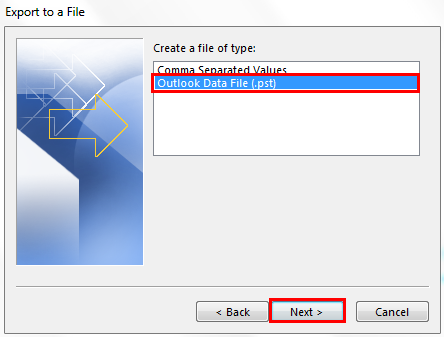
- After that, select the Export to a file option and press the Next
- In the new wizard, choose the Outlook Data File (.pst) option and proceed further by pressing Next.
- Now, select the desired mailbox items that you want to migrate. Tick the Include subfolder option and click Next.
- After that, browse the destination location for the PST file.
- Mark the Replace duplicate with items exported option and hit the Finish
- If required, enter the password for the resultant file.
- At last, click OK to export the PST file.
Converting OST to PST will make it possible to import OST to Office 365 accounts. Now, you can transfer the data.
Step 2: Import PST to Office 365
In the standard approach of migrating PST to Office 365, you have to upload your data to Azure Blob storage. Then you have to migrate it to your Office 365 account. The procedure is quite complicated. However, we explained it.
- Sign in to your MS Office 365 account. Go to Admin center>>Setup>>Data Migration.
- Now, click on the Upload PST file and then assign the Import/export role.
- After that, log in to the Exchange Admin Center and go to Permissions>>Admin Roles.
- Add a new role and name it as an Import-export Go back to the Upload a PST option.
- Name the job and click on Upload your data Copy the SAS URL and download Azure AzCopy.
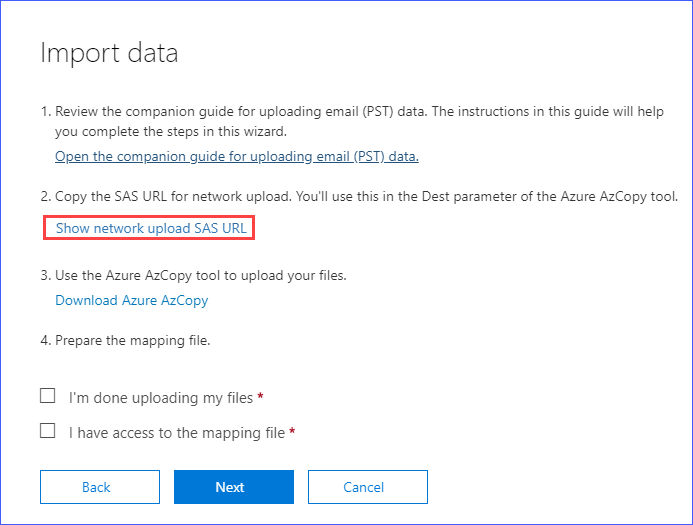
- Use the below link to upload PST to Azure blob storage.
AzCopy.exe /Source:<Location of the PST files> /Dest:<SAS URL> /V:<Log File Location> /Y
- Download a sample mapping file and edit it as per your requirement.
- Return to the Import data Tick the options and click Next to create the Import job.
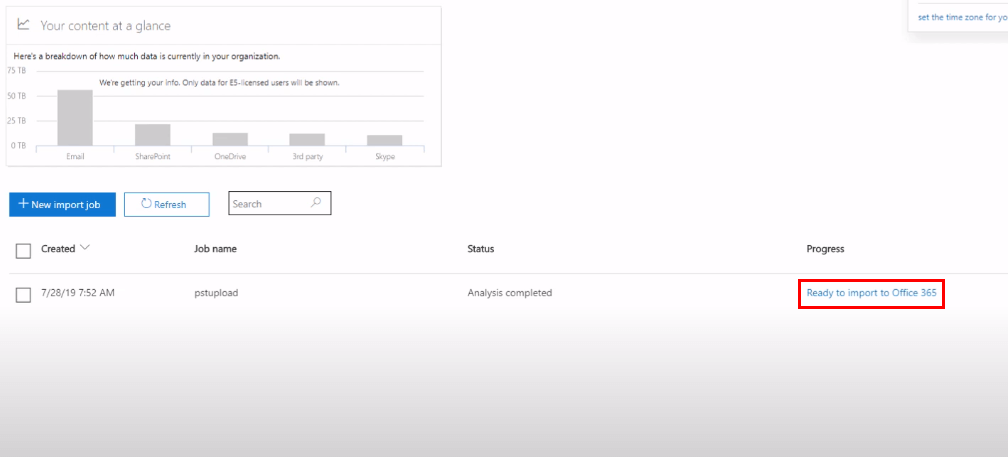
- At last, click on Ready to import to Office 365>>Import to Office 365>>Import Data.
The above technique is effective to import OST to Office 365. But it is time-consuming and difficult for new users. So, the best option is professional software.
Professional Tool to Convert OST to Office 365
The automatic tool to import OST to Office 365 is ideal for both naive and experienced users. It allows you to migrate the file in a few simple steps. The user interface is interactive; you do not need any additional assistance. Also, the chances of file corruption are low as compared to the manual approach. Hence, the Cigati OST to PST Converter tool is a fast, effective, and reliable alternative to manual methods.
Conclusion
The manual approach to import OST to Office 365 is quite complicated and everyone cannot perform the steps. Therefore, the best option is the automatic tool. OST converter tool is a fast and effective way to migrate the files without losing t


